
How to make step-by-step instructions with screenshots
Instructions are much easier to follow when the numbers in your text match numbers on the screen. Shotlighter's numbered markers count up on their own, so each step takes one click.
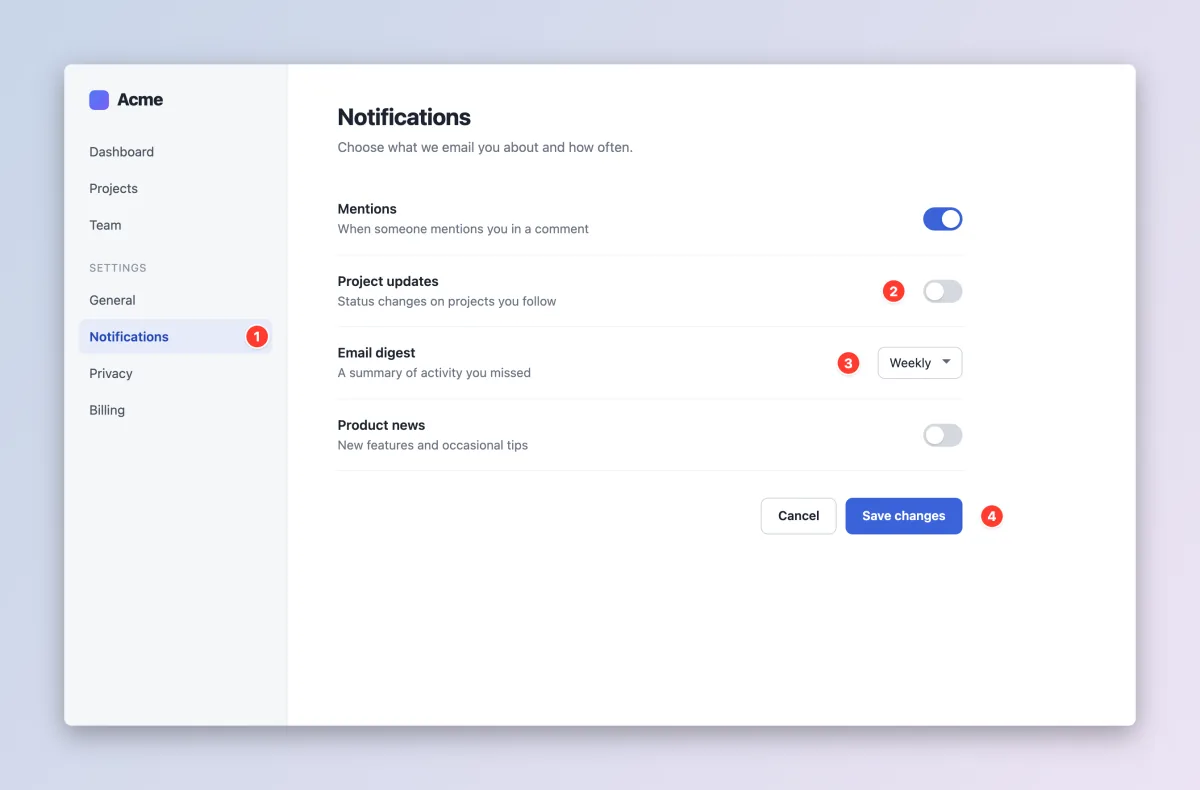
Add numbered steps
- Take a screenshot of the screen where the steps happen, and paste it into Shotlighter with ⌘V (Ctrl+V on Windows).
- Press N or click the numbered marker tool.
- Click next to each thing, in order. The first click places a 1, the next a 2, and so on. Put markers beside buttons rather than on top of them, so the button's label stays readable.
- Write the steps with the same numbers in your message, doc or help article.
- Copy or save with ⌘C or ⌘S (Ctrl+C or Ctrl+S).
The text that goes with the screenshot above:
1. Open Notifications in the sidebar.
2. Turn on Project updates.
3. Set Email digest to Daily.
4. Click Save changes.
Fix the order
Markers are numbered in the order you place them. If one lands in the wrong place, press ⌘Z (Ctrl+Z) and click again. To move a marker without changing its number, press V and drag it.
Add arrows and labels
Numbers show the order; arrows and labels show what to do. Add an arrow (A) when the target is small, and a short text label (T) when a step needs a value, like "Daily". See how to add arrows, boxes and text.
When the steps cover several screens
Use one screenshot per screen, each with its own markers starting from 1, and put the matching list under each image. Three to five steps per screenshot is plenty; more than that and the numbers get hard to find.
Make it look finished
For docs, help articles and slides, crop to the part of the window that matters with C, then press B to set it on a soft backdrop with a shadow. See how to crop a screenshot and add a backdrop.
Tips
- Use one marker color throughout a document, so readers learn what the circles mean.
- Start each step with the verb ("Open", "Turn on", "Click"), and bold the name of the button exactly as it appears on screen.
- Take the screenshot in the state the reader will see, with the right menu open and nothing extra selected.
- Hide personal details before sharing, especially in screenshots of account or admin pages. See how to blur or redact a screenshot.
More guides
- How to highlight text in a screenshotClean, straight highlights that snap to the text.
- How to blur or redact private info in a screenshotPixelate or black out names, emails, keys and card numbers.
- How to add arrows, boxes and text to a screenshotPoint at exactly what you mean.
- How to crop a screenshot and add a backdropTrim to what matters and make it look finished.
- How to take a screenshot on Mac or WindowsEvery shortcut, including copying straight to the clipboard.