
How to edit a screenshot on Windows
Windows comes with Snipping Tool, which can draw on a screenshot and crop it. For text labels, numbered steps or hiding private details, a dedicated editor is quicker. This guide covers both.
The short version: press Win+Shift+S, drag over an area, and click the notification to edit it in Snipping Tool. For more tools, open Shotlighter instead and press Ctrl+V.
On a Mac? See how to edit a screenshot on Mac.
Edit with Snipping Tool
- Take a screenshot with Win+Shift+S and drag over the area you want. On Windows 11, PrtSc does the same by default.
- Click the notification that appears in the bottom-right corner of the screen. The screenshot opens in Snipping Tool.
- Use the toolbar at the top. It has a pen, a highlighter, an eraser, a ruler for straight lines, and a crop tool. Recent versions on Windows 11 also have shapes and arrows.
- Press Ctrl+C to copy the edited screenshot, or Ctrl+S to save it.
Missed the notification? The screenshot is still on your clipboard. Open Paint and press Ctrl+V; Paint can crop, add text and draw shapes.
On Windows 11, the Text actions button in Snipping Tool can also find email addresses and phone numbers in the screenshot and cover them with Quick redact.
What Snipping Tool can't do
- Add text. There's no text tool, so labels mean switching to Paint.
- Hide any area you choose. Quick redact only covers the emails and phone numbers it finds. There's no pixelate or blur.
- Highlight text neatly. The highlighter is freehand. The ruler helps keep it straight, but you still line it up yourself.
- Number steps or add a backdrop for docs and slides.
Edit in Shotlighter
Shotlighter is a free screenshot editor that runs in your browser. It works from the clipboard, so there's no file to find first, and your images are never uploaded.
- Press Win+Shift+S and drag over the area. The screenshot goes to your clipboard.
- Open Shotlighter in Edge, Chrome or Firefox and press Ctrl+V. You can also drop a screenshot file onto the page, for example one from Pictures > Screenshots.
- Edit with the toolbar, or with the one-key shortcuts below.
- Press Ctrl+C to copy the result and paste it into Teams, Slack, Outlook or a doc, or Ctrl+S to save a PNG.
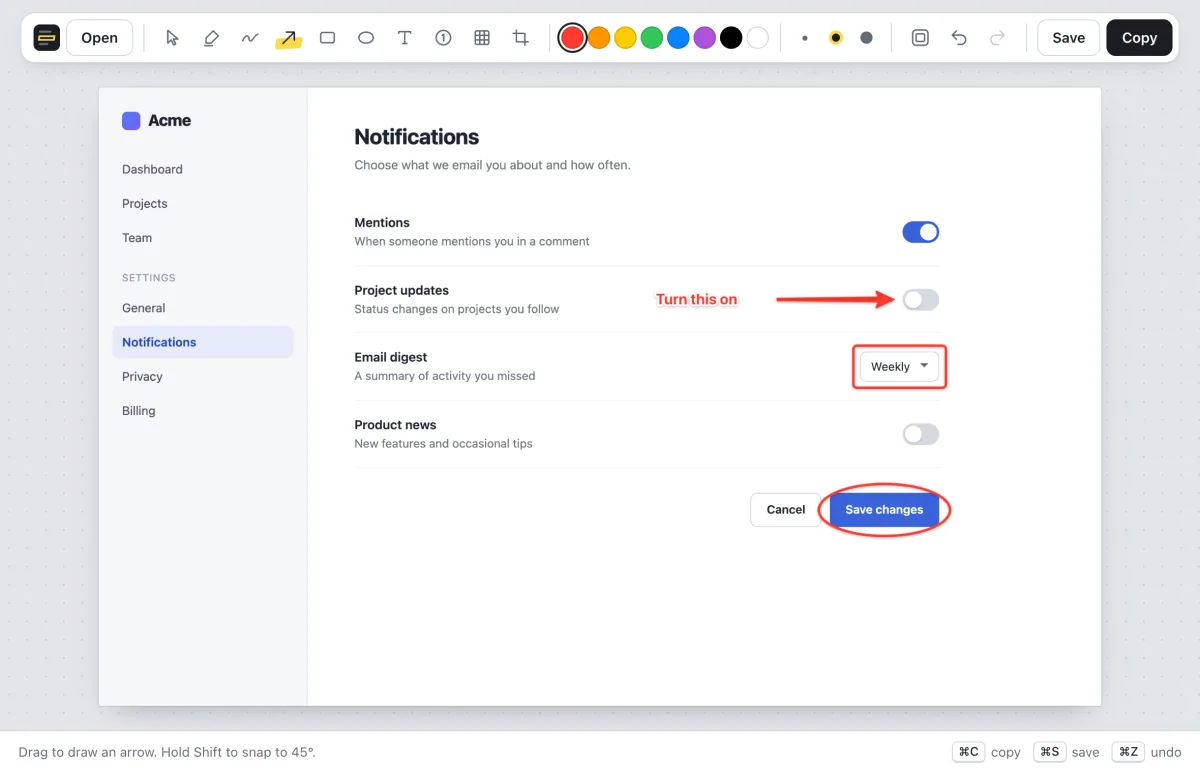
| Key | What it does |
|---|---|
| T | Text. Click and type a label. See how to add arrows, boxes and text. |
| A, R, E | Arrow, box and ellipse. Hold Shift for straight arrows, squares and circles. |
| H | Highlighter. Drag across text and it snaps to the line and to whole words. See how to highlight text. |
| N | Numbered marker. Counts up with each click. See step-by-step screenshots. |
| D | Redact. Pixelates any area you drag over; press D again for solid blocks. See how to blur a screenshot. |
| C, B | Crop and backdrop. Trim to what matters, then set it on a gradient with a shadow. See how to crop and add a backdrop. |
| Ctrl+Z | Undo, as far back as you need. |
Snipping Tool or Shotlighter?
| Snipping Tool | Shotlighter | |
|---|---|---|
| Pen and crop | Yes | Yes |
| Arrows and boxes | Recent Windows 11 versions | Yes |
| Text labels | No, use Paint | Yes |
| Highlight a sentence | Freehand, with a ruler | Snaps to the line and to whole words |
| Hide private details | Emails and phone numbers it finds | Pixelate or block out any area |
| Numbered steps | No | Counts up with each click |
| Backdrop and shadow | No | Yes |
| Copy text, record the screen | Yes | No |
Snipping Tool is already on your PC and is enough for a quick circle or a crop. Shotlighter is quicker when you're explaining something: a label, a highlight, a few numbered steps and a hidden email address take a few seconds each.
Pin Shotlighter to the taskbar
In Edge or Chrome, open Shotlighter and click the install icon in the address bar. It then opens in its own window like any other app, and works offline. To keep it handy, right-click its icon in the taskbar and choose Pin to taskbar.
Tips
- Remember Win+Shift+S. It works on Windows 10 and 11 and always copies to the clipboard. See how to take a screenshot on Mac or Windows for the other shortcuts.
- Check the taskbar and notifications before you share. They often show your name, email or other apps you have open.
- Crop before you annotate when the screenshot is large, so your arrows and labels stay in the frame.
More guides
- How to highlight text in a screenshotClean, straight highlights that snap to the text.
- How to blur or redact private info in a screenshotPixelate or black out names, emails, keys and card numbers.
- How to add arrows, boxes and text to a screenshotPoint at exactly what you mean.
- How to make step-by-step instructions with screenshotsNumbered markers that count up on their own.
- How to crop a screenshot and add a backdropTrim to what matters and make it look finished.
- How to edit a screenshot on MacThe built-in Markup tool, and a quicker way to highlight, number and blur.
- How to take a screenshot on Mac or WindowsEvery shortcut, including copying straight to the clipboard.