
How to add arrows, boxes and text to a screenshot
A red arrow and a short label turn "it's somewhere on this page" into "click here". This is how to annotate a screenshot in Shotlighter, plus a few habits that keep annotations easy to read.
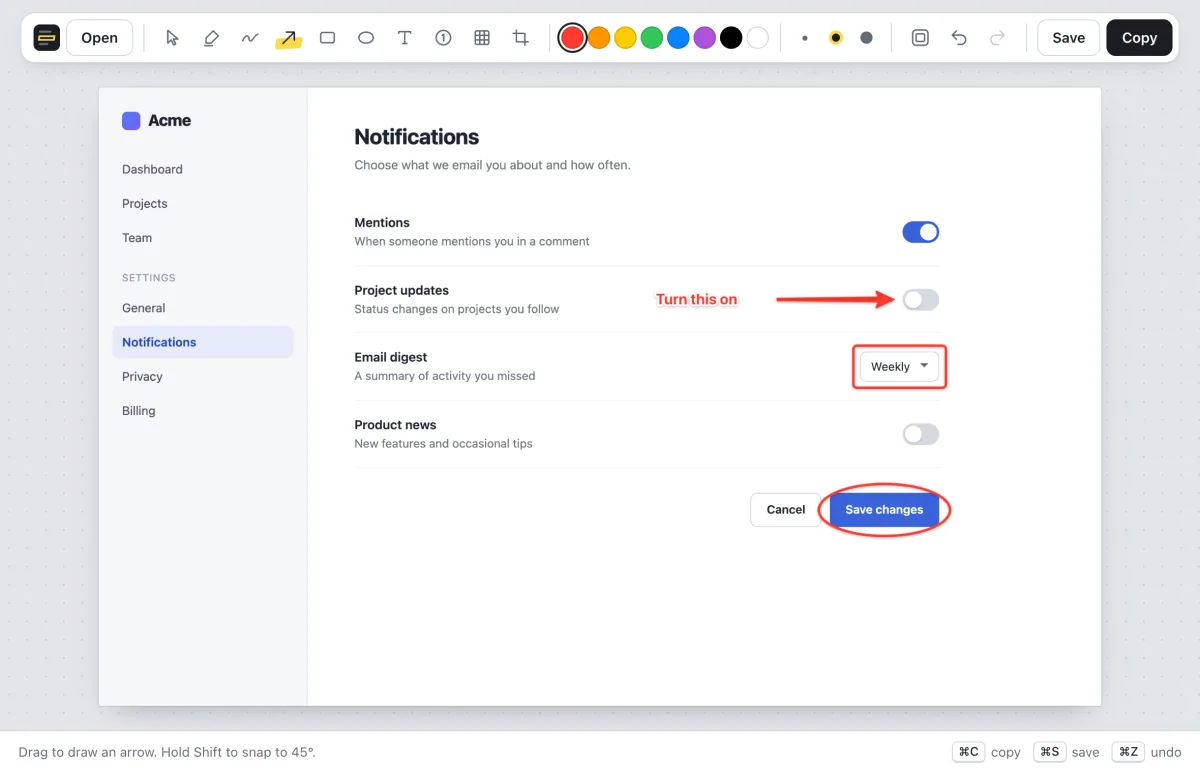
Add an arrow
- Paste your screenshot into Shotlighter with ⌘V (Ctrl+V on Windows).
- Press A or click the arrow tool.
- Drag from where the arrow starts to the thing it points at. The arrowhead goes where you let go. Hold Shift to keep it horizontal, vertical or at 45°.
- Copy or save with ⌘C or ⌘S (Ctrl+C or Ctrl+S).
Draw a box or a circle
Press R for a rectangle or E for an ellipse, then drag across the area. Hold Shift for a perfect square or circle. Boxes suit areas like a form section or a table row; circles work well around a single button or icon.
Add text
Press T, click where the text should start, and type. Press Enter to finish, or Shift+Enter to start a new line. To change the text later, press V for the select tool and double-click it.
Draw freehand
Press F for the pen when you need something the other tools don't do, like underlining a word or sketching a quick shape.
Change the color and size
Red is the default. Press a number key to switch colors: 1 red, 2 orange, 3 yellow, 4 green, 5 blue, 6 purple, 7 black and 8 white. Press the same number again for a darker shade, and once more for a lighter one; black and white step through grays. [ and ] make new lines and text smaller or larger.
To recolor something you've already drawn, press V, click it, then press a number.
Move, nudge or delete
Press V, then drag an annotation to move it. The arrow keys nudge the selected annotation, and Shift with an arrow key moves it further. Press Delete to remove it, or ⌘Z (Ctrl+Z) to undo.
Tips for clear annotations
- Stick to one color unless the colors mean something different. Red for "look here" is a convention most people read instantly.
- Stop the arrow just short of the target so the arrowhead doesn't cover what it's pointing at.
- Keep labels to a few words. Put the full explanation in your message, next to the image.
- Use numbers for sequences. If you're showing several clicks in order, numbered markers read better than a tangle of arrows. See how to make step-by-step instructions.
- Hide private details first. See how to blur or redact a screenshot.
More guides
- How to highlight text in a screenshotClean, straight highlights that snap to the text.
- How to blur or redact private info in a screenshotPixelate or black out names, emails, keys and card numbers.
- How to make step-by-step instructions with screenshotsNumbered markers that count up on their own.
- How to crop a screenshot and add a backdropTrim to what matters and make it look finished.
- How to take a screenshot on Mac or WindowsEvery shortcut, including copying straight to the clipboard.